Spotify Android SDK Beta
Allow your application to interact with the Spotify app running in the background as a service.
The Spotify Android SDK supports getting metadata for the currently playing track and context, issuing basic playback commands as well as initiating playback of tracks.
Getting started
The SDK consists of two libraries:
-
Authorization Library. This library is responsible for authorizing your app and fetching the access token that later can be used to send requests to the Spotify Web API.
-
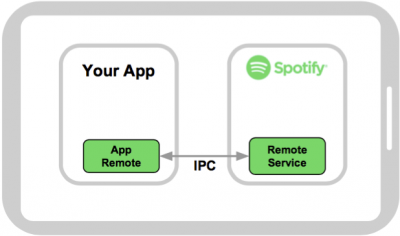
App Remote Library. The app remote module allows you to control playback in the Spotify app after user logs in with the access token.
We provide a Getting Started tutorial to help you set up your build environment and get started with the Spotify Android SDK.
The tutorial leads you through the creation of a simple app that connects to the Spotify app, plays a playlist and subscribes to PlayerState. Within the download package you will also find a demo app with full source code to help get you started.
In order to use the SDK, your application will need to get the user's permission to control playback remotely first. The authorization guide explains the two methods available to implement authorization in your Android application.
Key features
- Lightweight library (less than 300k). No native code or processor architecture dependencies
- Playback always in sync with Spotify app
- Processing of playback and caching as well as network traffic is accounted for by the Spotify app
- Handles system integration such as audio focus, lockscreen controls and incoming calls
- Automatically handles track relinking for different regions
- Works offline and online and does not require Web API calls to get metadata for player state
Download
The latest stable version of the Android SDK can be downloaded from GitHub.
Requirements
- Minimum Android SDK Version 14
- Gson (version 2.6.1)
Documentation
The documentation is organized as follows:
- Concepts that clarify key topics
- Tutorials, which serve as an introduction to important topics when using Android SDK
- Reference, the API specification
API documentation
The download packages includes comprehensive documentation of all API classes
in the /docs folder. You can also read the documentation online for the
authentication library and
for the app remote library.
Frequently asked questions
SpotifyAppRemote connect/disconnect v0.4.0 vs v0.5.0
_10// If your code looks like this for v0.4.0:_10SpotifyAppRemote.CONNECTOR.disconnect(mSpotifyAppRemote);_10SpotifyAppRemote.CONNECTOR.connect(this, mConnectionParams, mConnectionListener);_10// you should change it to this as of v0.5.0:_10SpotifyAppRemote.disconnect(mSpotifyAppRemote);_10SpotifyAppRemote.connect(this, mConnectionParams, mConnectionListener);
I want the Spotify app to notify my app when Spotify is active. Is it possible?
You can register a broadcast receiver for an action "com.spotify.music.active". The broadcast is sent when a new track gets on top of the playing queue.
To listen to the broadcast add the next lines to your AndroidManifest.xml file:
_10<receiver android:name="<ReceiverClassName>">_10 <intent-filter>_10 <action android:name="com.spotify.music.active"/>_10 </intent-filter>_10</receiver>
To get more information on BroadcastReceivers, have a look at the docs on the Android developer portal.
Can I use Jackson instead of Gson?
Since version 0.2.0 of the SDK, Gson is used by default for serializing and deserializing the request, but the use of Jackson is still supported. If you want to use Jackson, you need to configure it when connecting to Spotify:
_10ConnectionParams connectionParams =_10 new ConnectionParams.Builder(CLIENT_ID)_10 .setRedirectUri(REDIRECT_URI)_10 .setJsonMapper(JacksonMapper.create())_10 .build();_10_10SpotifyAppRemote.connect(this, connectionParams, connectionListener);
Support
Please report problems with this SDK through the public issue tracker on GitHub.
Legal
Note that by using Spotify Android SDK, you accept our Developer Terms of Service.