Building a Spotify Player inside a Web app
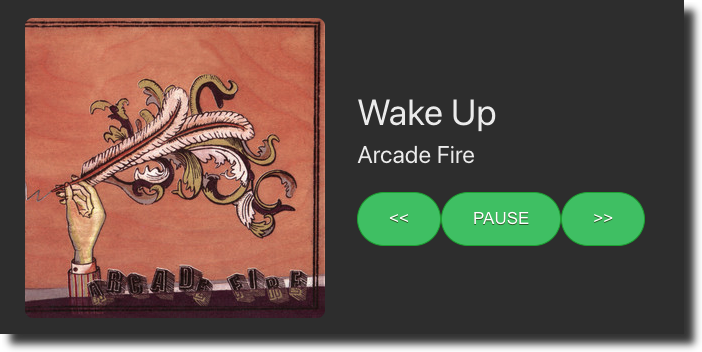
The following how-to will lead you to step by step create a simple full-stack application to host the Spotify player to play music along with the rest of the devices from your home. By the end of the how-to, you will have a fully working Spotify Player running on your browser similar to this one:
Let's start coding!
Prerequisites
The Web Playback SDK requires Spotify Premium, so you'll need a premium account to use it.
This how-to assumes that you have some knowledge of JavaScript -both frontend using React and backend with Node.
Although not fully necessary, it is highly recommended to read the Quick Start Guide before this how-to.
Source Code
The source code of the application can be found on the Spotifty GitHub repository. Feel free to fork it if you feel like it!
Set up your Account
Go to Spotify for Developers portal and log in using your Spotify credentials (You can find the login button under the Dashboard).
The dashboard is where we can create apps, control the API credentials bound to the app or just get some nice app usage statistics. Click on the Create an APP button and provide a name and a short description of your new application. Finally, accept the terms and conditions and click on Create. Your new application contains your Client ID and Client Secret needed to authorize the application we are about to code to use the Spotify resources.
Initializing the Project
The easiest way to start a project based on React is using the
create-react-app tool. Open a terminal and run the tool
using the npx command:
_10npx create-react-app spotify-web-player_10cd spotify-web-player
npx is pre-bundled with npm since 5.2.0 version. The command creates a new
folder called spotify-web-player that we will use as a template for our
project, along with the package.json file which contains the project
configuration.
Let's install the dependencies and test the project by running:
_10npm install_10npm run start
Go to your browser and open http://localhost:3000. If you see a spinning
React logo, then the React project is ready.
Let's create a server folder which will contain the implementation of the
backend:
_10mkdir server
Finally, let's add some extra commands to the package.json file to properly
start the project. Open the package.json with your favorite editor and add
the following entries inside the script section of the file:
_10 "scripts": {_10 "start": "react-scripts start",_10 "build": "react-scripts build",_10 "server": "node server",_10 "dev": "run-p server start"_10 },
Each entry corresponds with the following actions:
startstarts an HTTP server on port 3000 to serve the React application.buildgenerates the static code ready to be deployed in production.serverexecutes theindex.jsfile located on theserverfolder.devruns both client and server up usingrun-ptool to allow run multiple npm-scripts in parallel.
The run-p command belongs to the npm-run-all package. Let's install the
dependency by running the following command:
_10npm install npm-run-all --save-dev
Now that the project is ready, let's move forward and start coding the backend's authorization.
Authorization
Spotify allows developers to authenticate in several ways. Our project will implement the Authorization Code flow, which is very convenient for long-running apps, such as web apps, where the user grants permissions only once.
Rather than hard-coding the user credentials inside the source code of our
application, we are going to use the dotenv package to store and read them
from a hidden configuration file.
Install the dependency with the following command:
_10npm install dotenv --save-dev
Create a .env file in the root folder of the project and add the following
variables using the NAME=VALUE format:
_10SPOTIFY_CLIENT_ID='my_spotify_client_id'_10SPOTIFY_CLIENT_SECRET='my_spotify_client_secret'
The values are now accessible as environment variables and can be read using
process.env:
_10var spotify_client_id = process.env.SPOTIFY_CLIENT_ID_10var spotify_client_secret = process.env.SPOTIFY_CLIENT_SECRET
The idea behind the server is to export some basic endpoints to the frontend corresponding to the steps of the authorization flow:
/auth/loginto request user authorization by getting an Authorization Code./auth/callbackto request the Access Token using the Authorization Code requested in the previous step.
We will use Express to receive and handle all incoming requests to the server. Let's start by installing the package dependency:
_10npm install express --save-dev
Create a new index.js file inside the server folder with the following
content:
_21const express = require('express')_21const dotenv = require('dotenv');_21_21const port = 5000_21_21dotenv.config()_21_21var spotify_client_id = process.env.SPOTIFY_CLIENT_ID_21var spotify_client_secret = process.env.SPOTIFY_CLIENT_SECRET_21_21var app = express();_21_21app.get('/auth/login', (req, res) => {_21});_21_21app.get('/auth/callback', (req, res) => {_21});_21_21app.listen(port, () => {_21 console.log(`Listening at http://localhost:${port}`)_21})
We can test the server with the following command:
_10npm run server
If everything goes fine, the server will start listening incoming requests on port 5000.
We are ready to start coding the authorization flow!
Request User Authorization
The first step is to redirect the user to a web page where they can choose to grant our application access to their premium account.
To do so, we need to send a GET request to the /authorize endpoint of the
Spotify account service with the following parameters:
response_type, is the credential that will be returned. The value will always becode.client_id, is the Client ID of the application we have just created on the portal dashboard.scope, a space-separated list of actions that our app can be allowed to do on a user's behalf. We need permission forstreaming,user-read-emailanduser-read-privatefor the Web Player SDK.redirect_uriis the URL that Spotify's Authorization server will redirect once the access token is granted. Since we are running the project locally, our redirect URL will point tolocalhost:3000/auth/callbacksince all petitions are handled from the frontend.state, a randomly generated string to protect against attacks such as cross-site request forgery.
Although state is not mandatory, is highly recommended including one. Here
you have our proposal to generate randomly generated strings. Of course, feel
free to implement something different:
_10var generateRandomString = function (length) {_10 var text = '';_10 var possible = 'ABCDEFGHIJKLMNOPQRSTUVWXYZabcdefghijklmnopqrstuvwxyz0123456789';_10_10 for (var i = 0; i < length; i++) {_10 text += possible.charAt(Math.floor(Math.random() * possible.length));_10 }_10 return text;_10};
We have everything we need to implement the user authorization request. The
following code implements the GET method, which performs the redirection to
the Spotify login screen to allow users to grant permissions:
_18router.get('/auth/login', (req, res) => {_18_18 var scope = "streaming \_18 user-read-email \_18 user-read-private"_18_18 var state = generateRandomString(16);_18_18 var auth_query_parameters = new URLSearchParams({_18 response_type: "code",_18 client_id: spotify_client_id,_18 scope: scope,_18 redirect_uri: "http://localhost:3000/auth/callback",_18 state: state_18 })_18_18 res.redirect('https://accounts.spotify.com/authorize/?' + auth_query_parameters.toString());_18})
Response
Once the user approves the application request, the user is redirected back
to the application using the redirect_uri passed on the authorized request
http://localhost:3000/auth/callback just described above.
The callback contains two query parameters:
- An authorization
codethat will be exchanged for an access token. - The same
statesupplied in the request.
Before continuing with the second step, we need to go back to the portal to
allow our application to perform callbacks to the redirect_uri we have
supplied on the previous call:
- Go to the Dashboard and select the application we created on the first step.
- Click on Edit Settings and add the URL callback
http://localhost:3000/auth/callbackunder the Redirect URIs field.
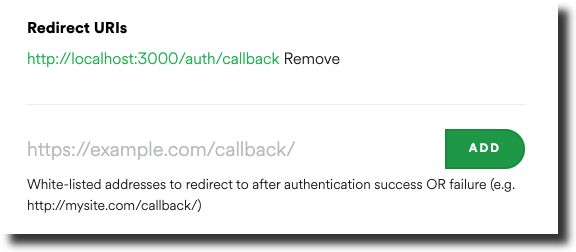
Remember to click save for the changes to take effect.
Request Access Token
Now that we have the authorization code, we must exchange it for tokens. Using
the code from the previous step, we need to make a POST request to the
/api/token endpoint.
The body of the request must be encoded in application/x-www-form-urlencoded
with the following parameters:
grant_type, must always contain the valueauthorization_code.code, is the authorization code returned on the previous step.redirect_uri, must exactly match the same value sent on the user authorization request (previous step). This value is used for validation only since there is no actual redirection.
We must also include the following HTTP headers:
Authorization, is a base64 encoded string that contains the client ID and client secret keys. The field must have the format:Basic *<base64 encoded client_id:client_secret>*Content-type, set with the valueapplication/x-www-form-urlencodedto inform the server about the encoding of the body.
As the POST HTTP call will be made using the request library, we need to
install the dependency:
_10npm install request --save-dev
We are now ready to implement the /auth/callback endpoint of our server:
_25app.get('/auth/callback', (req, res) => {_25_25 var code = req.query.code;_25_25 var authOptions = {_25 url: 'https://accounts.spotify.com/api/token',_25 form: {_25 code: code,_25 redirect_uri: "http://localhost:3000/auth/callback",_25 grant_type: 'authorization_code'_25 },_25 headers: {_25 'Authorization': 'Basic ' + (Buffer.from(spotify_client_id + ':' + spotify_client_secret).toString('base64')),_25 'Content-Type' : 'application/x-www-form-urlencoded'_25 },_25 json: true_25 };_25_25 request.post(authOptions, function(error, response, body) {_25 if (!error && response.statusCode === 200) {_25 var access_token = body.access_token;_25 res.redirect('/')_25 }_25 });_25})
Note how the authentication ends with the access_token stored locally and redirection to /.
Response
If everything goes well, we will receive an HTTP 200 response with the access_token in the payload of the response:
_10{_10 "access_token":"BQBZiiCqVjpZz9Boj1-8WirXFLgBpfZJwSR0Kw",_10 "token_type":"Bearer",_10 "expires_in":3600,_10 "refresh_token":"AQC-JL7jaByIRKwZiFb29Tf_2AlF1qs",_10 "scope":"streaming user-read-email user-read-private"_10}
Return Access Token
The backend implements the /auth/token endpoint to return the access token in
JSON format. The code looks like this:
_10app.get('/auth/token', (req, res) => {_10 res.json(_10 {_10 access_token: access_token_10 })_10})
This access token will be used to instantiate the Web Playback SDK and, eventually, perform API calls using the Web APIs.
Proxying Backend Requests
During the development phase, our React app and backend will run on different hosts and ports:
- The client runs on
localhost:3000 - The backend runs on
localhost:5000
Thus, we need to tell our React app where to find the server when doing API
calls such as /auth/login or /auth/token.
There are different approaches to do so:
- Use the canonical URI on every API call.
- Adding a
proxyfield to thepackage.jsonfile:"proxy": "http://localhost:5000". - Set up our own proxy using the
http-proxy-middlewarepackage.
Let's include the package in our project by doing:
_10npm install http-proxy-middleware --save-dev
Now, add a new file called setupProxy.js to the src folder with the following content:
_10module.exports = function (app) {_10 app.use(proxy(`/auth/**`, { _10 target: 'http://localhost:5000' _10 }));_10};
This way, all petitions with the /auth/** pattern will be redirected to the
backend.
React Components
Login Component
Let's start by implementing a welcome screen with a nice Login in button to start the authorization flow we have just implemented on the backend side.
Open the src/App.js and replace the current implementation with this one:
_29import React, { useState, useEffect } from 'react';_29import WebPlayback from './WebPlayback'_29import Login from './Login'_29import './App.css';_29_29function App() {_29_29 const [token, setToken] = useState('');_29_29 useEffect(() => {_29_29 async function getToken() {_29 const response = await fetch('/auth/token');_29 const json = await response.json();_29 setToken(json.access_token);_29 }_29_29 getToken();_29_29 }, []);_29_29 return (_29 <>_29 { (token === '') ? <Login/> : <WebPlayback token={token} /> }_29 </>_29 );_29}_29_29export default App;
The component uses the useEffect hook to send a GET request to the
/auth/token endpoint to check if we have a valid access_token already
requested.
Once received, the access_token is stored using the setToken(), so the
component will be rendered according to the following logic:
- The
Logincomponent will be loaded in case theaccess_tokenis still empty. - If the
access_tokenhas been requested already (there is an active session ongoing), theWebPlabackcomponent will load instead, receiving theaccess_tokenwe have just requested.
Let's take a look at the Login component:
_16_16import React from 'react';_16_16function Login() {_16 return (_16 <div className="App">_16 <header className="App-header">_16 <a className="btn-spotify" href="/auth/login" >_16 Login with Spotify _16 </a>_16 </header>_16 </div>_16 );_16}_16_16export default Login;
The login screen consists of one single button inviting users to log in. Once
the user clicks on Login with Spotify, the component will perform a GET
operation to /auth/login to start the authentication flow described on the
previous section.
WebPlayback Component
Let's create a new component to implement the web player. Create a new file
called Webplayback.jsx and add a basic new React functional component as
follows:
_16import React, { useState, useEffect } from 'react';_16_16function WebPlayback(props) {_16_16 return (_16 <>_16 <div className="container">_16 <div className="main-wrapper">_16_16 </div>_16 </div>_16 </>_16 );_16}_16_16export default WebPlayback
Add the useEffect hook so the instance of the Web Playback SDK object is
created right before we render the page for the first time:
_32_32useEffect(() => {_32_32 const script = document.createElement("script");_32 script.src = "https://sdk.scdn.co/spotify-player.js";_32 script.async = true;_32_32 document.body.appendChild(script);_32_32 window.onSpotifyWebPlaybackSDKReady = () => {_32_32 const player = new window.Spotify.Player({_32 name: 'Web Playback SDK',_32 getOAuthToken: cb => { cb(props.token); },_32 volume: 0.5_32 });_32_32 setPlayer(player);_32_32 player.addListener('ready', ({ device_id }) => {_32 console.log('Ready with Device ID', device_id);_32 });_32_32 player.addListener('not_ready', ({ device_id }) => {_32 console.log('Device ID has gone offline', device_id);_32 });_32_32_32 player.connect();_32_32 };_32}, []);
The first step to install the SDK is to load the library creating a new
script tag within the DOM tree. As the onSpotifyWebPlaybackSDKReady method
will be executed right after the Web Playback SDK has been successfully
loaded, we create the Player instance inside the callback using the
access_token supplied via React props
Once the Player object has been successfully created, we store the object
using the userPlayer() hook, which has been defined as follows:
_10const [player, setPlayer] = useState(undefined);
The callback also connects the events emitted by the SDK using the addListener method of the player. You can find detailed information about the events supported by the SDK on the SDK reference page
The events we want to get notified are:
- ready, emitted when the SDK is connected and ready to stream content.
- not_ready, in case the connection is broken.
- player_state_changed, emitted when the state of the local playback has changed (i.e., change of track).
Finally, the method calls to connect method to perform the connection of our new Spotify instance.
Running everything together
At this point we are ready to test the application:
- Open a console and run the both client and server using the
npm run devcommand. - Open a browser and go to
http://localhost:3000. - Click on the "Log in with Spotify" button.
- Log in to Spotify using your credentials if you haven't done it yet.
- Open any Spotify client. You should be able to see a new Spotify instance in the Spotify connect button.
- If you switch to the new instance, the music should start playing within the browser.
Congrats! The first step has been successfully accomplished! What about displaying some cool information about the stream currently playing, such as artist, track or album cover?
Playback Information Display
Let's modify our WebPlayback component to store and display information about
the track that is currently playing. Add the following hooks to the component:
_10const [is_paused, setPaused] = useState(false);_10const [is_active, setActive] = useState(false);_10const [current_track, setTrack] = useState(track);
is_pausedis a boolean variable that indicates whether the current track is being played or not.is_activeto indicate whether the current playback has been transferred to this player or not.current_track, an object to store the currently playing track.
Next step, we need to define the track JSON object. Add the following code
outside the component implementation:
_11const track = {_11 name: "",_11 album: {_11 images: [_11 { url: "" }_11 ]_11 },_11 artists: [_11 { name: "" }_11 ]_11}
Extend the useEffect() hook by adding a new eventListener to, once the
event is emitted, update the component with the current track
_15player.addListener('player_state_changed', ( state => {_15_15 if (!state) {_15 return;_15 }_15_15 setTrack(state.track_window.current_track);_15 setPaused(state.paused);_15_15_15 player.getCurrentState().then( state => { _15 (!state)? setActive(false) : setActive(true) _15 });_15_15}));
Finally, let's display information about the track the user is currently
playing. Replace the render method with the following code:
_20return (_20 <>_20 <div className="container">_20 <div className="main-wrapper">_20 <img src={current_track.album.images[0].url} _20 className="now-playing__cover" alt="" />_20_20 <div className="now-playing__side">_20 <div className="now-playing__name">{_20 current_track.name_20 }</div>_20_20 <div className="now-playing__artist">{_20 current_track.artists[0].name_20 }</div>_20 </div>_20 </div>_20 </div>_20 </>_20)
Playback Control
Once the playback is transferred to the browser, there is no way to modify the state of the playback, e.g. move to the next or previous tracks or pause/resume the playback.
Let's add three new buttons to the WebPlayback component that will call to
nextTrack(), previousTrack(), and
togglePlay() methods from the SDK:
_11<button className="btn-spotify" onClick={() => { player.previousTrack() }} >_11 <<_11</button>_11_11<button className="btn-spotify" onClick={() => { player.togglePlay() }} >_11 { is_paused ? "PLAY" : "PAUSE" }_11</button>_11_11<button className="btn-spotify" onClick={() => { player.nextTrack() }} >_11 >>_11</button>
Preparing for Production
There are different approaches to roll out your React application in production along with the backend server. In this how-to, we will cover the manual steps to build and place the code into one single folder.
Let's start by generating the React app and all the static assets:
_10npm run build
If everything went fine, a new build folder will be generated containing all
the generated files. You can check that the application works fine by using
the serve HTTP server to serve the static files:
_10npm install -g serve_10serve -s build
As we will be using the React server we have implemented through the how-to,
we need to extend the backend server to serve static files. Open the
server/index.js file and add the following line:
_10app.use(express.static(path.join(__dirname, '../build')));
From now on, we can run the server and load files directly from the server, for example:
_10http://localhost:5000/index.html_10http://localhost:5000/static/js/main.js
Next Steps
If you have reached this point, congratulations! Your first Spotify instance is up and running!
But this is just the beginning! What could we do next? Here you have some ideas to add to the prototype:
- Use the
refresh_tokenfield from the Request Access Token response to request a new token once the current one expires. - Use the Search endpoint to include search capabilities by artist, albums, or tracks.
- Include a Transfer Playback button to transfer the current playback to another Spotify instance using the Get Playback State endpoint.
- Get and play any of your favourite playlists using the Get Playlist endpoint.